
先だって、AWS Lightsail上で2つめのredmineを構築する手順について触れました。
こちらをLet's Encryptで常時SSL化します。
前提
- Ubuntu 20.04、Apache2での記録です。
- 以下、sample.comで証明書を発行するための記録です。ドメインはお持ちのものを使ってください。(自環境で実施する際は必ず書き換えてください)
- certbotで定期的に更新を行うのではなく、多目的に用いるために手動でワイルドカード証明書を発行する手順です。
- 既にcertbotはインストールされていることと、DNSの更新権限を持っていることが前提です。
また、管理者権限で実施します。
ワイルドカード証明書発行
sudo certbot certonly --manual \
    --preferred-challenges dns-01 \
    --server https://acme-v02.api.letsencrypt.org/directory \
    -m メールアドレス \
    -d *.sample.com
TXTレコード登録
- - - - - - - - - - - - - - - - - - - - - - - - - - - - - - - - - - - - - - - -
NOTE: The IP of this machine will be publicly logged as having requested this
certificate. If you're running certbot in manual mode on a machine that is not
your server, please ensure you're okay with that.

Are you OK with your IP being logged?
- - - - - - - - - - - - - - - - - - - - - - - - - - - - - - - - - - - - - - - -
(Y)es/(N)o: y
# IPは記録される旨を訊かれるので了承のためY

- - - - - - - - - - - - - - - - - - - - - - - - - - - - - - - - - - - - - - - -
Please deploy a DNS TXT record under the name
_acme-challenge.sample.com with the following value:

「文字列」

# 上記文字列をDNSのテキストレコードに登録します
# 登録後、
# nslookup -type=TXT _acme-challenge.sample.comを入力し、「文字列」が返ってくるまで少し待ちます

Before continuing, verify the record is deployed.
- - - - - - - - - - - - - - - - - - - - - - - - - - - - - - - - - - - - - - - -
Press Enter to Continue

# TXTレコードが返ってくるのを確認したらEnter
発行完了
IMPORTANT NOTES:
 - Congratulations! Your certificate and chain have been saved at:
   /etc/letsencrypt/live/sample.com/fullchain.pem
   Your key file has been saved at:
   /etc/letsencrypt/live/sample.com/privkey.pem
   Your cert will expire on 2023-03-24. To obtain a new or tweaked
   version of this certificate in the future, simply run certbot
   again. To non-interactively renew *all* of your certificates, run
   "certbot renew"
 - If you like Certbot, please consider supporting our work by:

   Donating to ISRG / Let's Encrypt:   https://letsencrypt.org/donate
   Donating to EFF:                    https://eff.org/donate-le
発行確認
cd /SSL一時格納ディレクトリ

cp -pi /etc/letsencrypt/live/sample.com/fullchain.pem ./sample.com.crt.$(date +%Y%m)
cp -pi /etc/letsencrypt/live/sample.com/privkey.pem ./sample.com.key.$(date +%Y%m)
# 一時格納ディレクトリにコピーします


openssl x509 -noout -dates -subject -in ./sample.com.crt.$(date +%Y%m)
# 証明書の発行期限を確認します

openssl x509 -in sample.com.crt.$(date +%Y%m) -noout -modulus | md5sum
openssl rsa -in sample.com.key.$(date +%Y%m) -noout -modulus | md5sum
# 証明書と秘密鍵のハッシュがそれぞれ一致していることを確認します

openssl x509 -issuer_hash -noout -in sample.com.crt.$(date +%Y%m)
sed -n -e'1d' -e'/BEGIN/,$p' sample.com.crt.$(date +%Y%m) | openssl x509 -subject_hash -noout
# 証明書と中間証明書のハッシュがそれぞれ一致していることを確認します
SSL格納、リンク貼り替え
mkdir /etc/certs
cp -pi sample.com.crt.$(date +%Y%m) /etc/certs
# 証明書ディレクトリ

cd /etc/certs
ln -sf sample.com.crt.$(date +%Y%m) sample.com.crt
# Let's Encryptは有効期限が3ヶ月と短いため、メンテナンスしやすいようにリンクを貼り替えるだけで更新できるようにします
ll
# シンボリックリンクが張られていることを確認します

mkdir /etc/private
cp -pi sample.com.key.$(date +%Y%m) /etc/private
# 秘密鍵ディレクトリ

cd /etc/private
ln -sf sample.com.key.$(date +%Y%m) sample.com.key
# Let's Encryptは有効期限が3ヶ月と短いため、メンテナンスしやすいようにリンクを貼り替えるだけで更新できるようにします
ll
# シンボリックリンクが張られていることを確認します
リリースファイル
cd /etc/sites-available/redmine2.conf
<VirtualHost *:80>
servername redmine2.sample.com
# 常時SSL化の設定
 RewriteEngine On
        RewriteCond %{HTTPS} off
        RewriteRule ^(.*)$ https://%{HTTP_HOST}%{REQUEST_URI} [R=301,L]
</VirtualHost>
<VirtualHost *:443>
  ServerName redmine2.sample.com
  ErrorLog /var/log/apache2/atlier/redmine2.sample.com_error.log
  CustomLog /var/log/apache2/atlier/redmine2.sample.com_access.log combined

Alias /redmine2 /var/lib/redmine2/public
<Location /redmine2>
PassengerBaseURI /redmine2
PassengerAppRoot /var/lib/redmine2
Require all granted
</Location>


#SSL対応
  SSLEngine on
    Protocols h2 http/1.1
    Header always set Strict-Transport-Security "max-age=63072000"

# 先に指定したLet's Encryptの格納先
SSLCertificateFile /etc/certs/sample.com.crt
SSLCertificateKeyFile /etc/private/sample.com.key

        # redmine2.sample.comでアクセスしてきた場合、強制的に/redmine2サブディレクトリに遷移します
        RewriteEngine On
        RewriteCond %{HTTP_HOST} ^redmine2\.sample\.com
        RewriteRule ^/$ https://redmine2.sample.com/redmine2/ [R]

</VirtualHost>

SSLProtocol             all -SSLv3 -TLSv1 -TLSv1.1
SSLCipherSuite          ECDHE-ECDSA-AES128-GCM-SHA256:ECDHE-RSA-AES128-GCM-SHA256:ECDHE-ECDSA-AES256-GCM-SHA384:ECDHE6-GCM-SHA384
SSLHonorCipherOrder     off
SSLSessionTickets       off

SSLUseStapling On
SSLStaplingCache "shmcb:logs/ssl_stapling(32768)"
動作確認
http://redmine2.sample.com (自分が設定したドメイン名)にアクセスして
- redmineの画面が表示されること
- SSl通信に置き換わること
を確認します。また、こちらの設定は可能な限りSSLの強度を高めています。
https://www.ssllabs.com/ssltest/analyze.html
こちらの暗号化強度チェックで
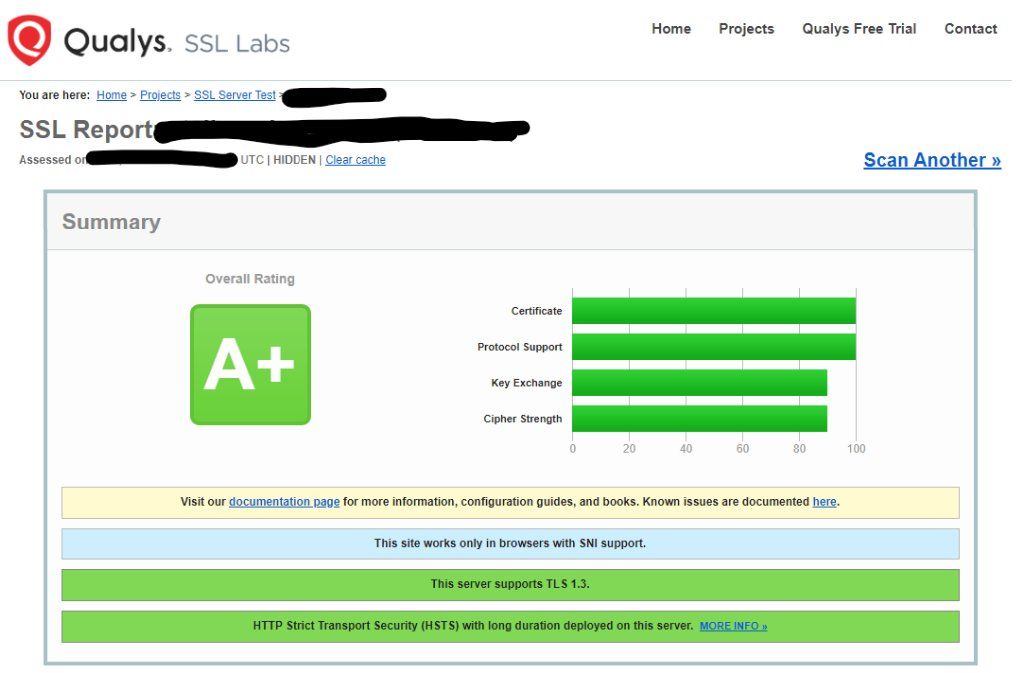
A+となっています。(2022年12月現在
コメントを残す